Thursday, September 29, 2011

And the Dress and the Winner Is......

Three people chose the correct dress for my Shabby Apple giveaway (girls after my own heart, at least fashion-wise). The dress is San Gabriel! And the random number generator chose number 1 out of 3, which is my good friend Laurie of Magpie Ethel! I've been so lucky to receive so many wonderful treats from her and I'm more than glad to send something her way.

Thank you so much everyone for participating! And don't worry, I'll be doing a spun cotton giveaway within the next couple of weeks, so you'll all have another chance to win! :)

My (sort of) Finished Dining Room!

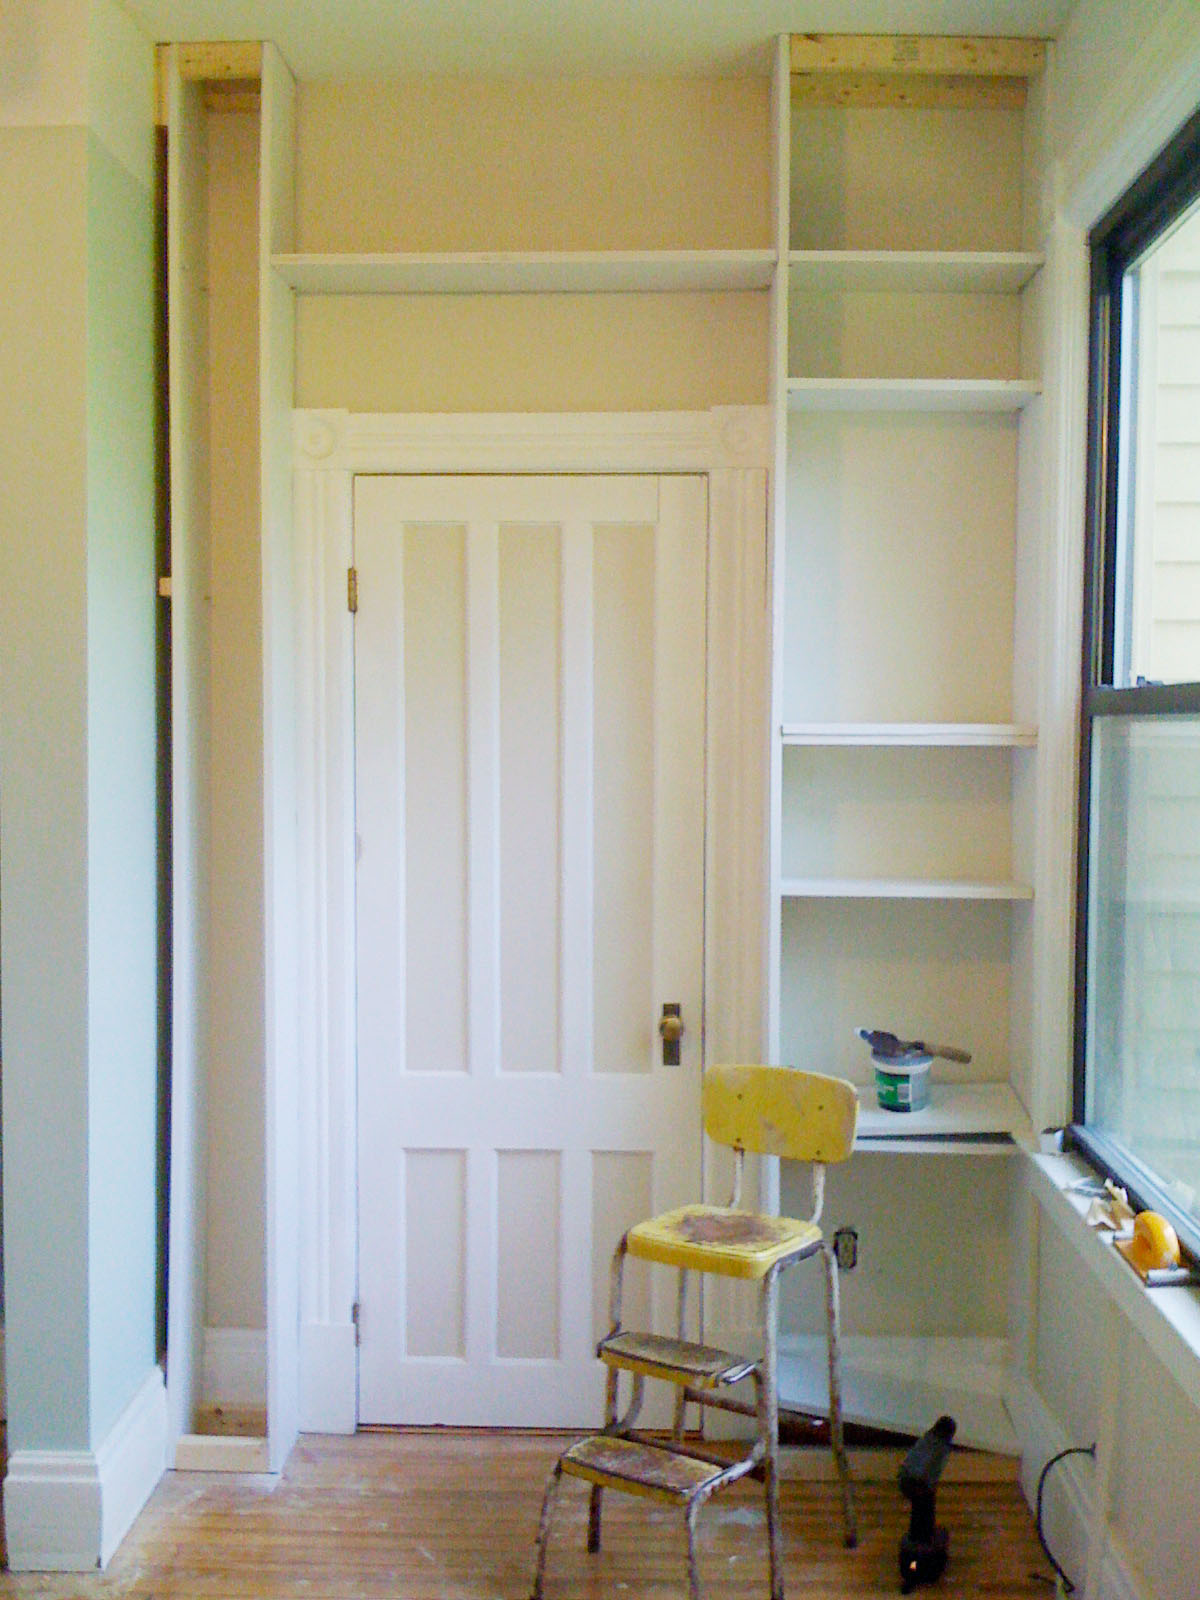
I am so smitten with the way our our "new" dining room is looking! I completed the shelves (sort of) last weekend and added the crown molding to the whole room. I still need to cut three more shelves and add the baseboard (it was supposed to be delivered to the local lumber place last Friday, but hopefully it will be there tomorrow) and a small strip of molding along one side to hide a gap.

Oh...and these photos aren't the best - I know I say that a lot...but sigh...

Other than those few little things, it's stuff ready! As you can see I couldn't wait to start putting stuff on. I just grabbed a bunch of random stuff I had in the basement and arranged it. It will certainly change and evolve as I get the rest of our possessions organized and put away, but I just had to see what it looked like with some milk glass and shell art bling.

I'd like to add more books...there have been a lot I've been wanting to reference for inspiration that are still boxed up in a big stack downstairs!

So much space to put things! Wasted space transformed...perfect for collectors like me!

And you can sit on the shelves under the window sills. Someday I may make cushions for them, but for now they'll hold plants and the random uncushioned butt.

I even added skinny shelves to the very narrow strip of wall between the window and the wall.


I'm super proud of my crown molding job...it's actually easier than a lot of people make it out to be. And the lumber yard had super cheap finger jointed pre-primed crown...I love it! I'll be crowning out the rest of the house in no time! Which means I'll be holding on to my dad's miter saw for a little while longer...thanks dad!

Can you believe it! The supplies for this whole project cost about $400, which means I saved around $4,000 by doing this job myself! And I did all of this single handedly. Ben held some of the long pieces of crown for me while I nailed, but that's it! If I can do it, anyone can!

Oh, and speaking of Dad, he let me raid his own little lumber yard in the loft of his barn (where Ben and I got married) for wood to build a new dining room table. I found rafter beams that came from the 150 year old two story shed he recently tore down to build my mom's new studio. Those became the legs. The top was cut from two huge and super heavy 3.5" thick boards that my dad had milled from trees from his woods a long time ago. He intended to make furniture from it, but as life goes, never got around to it. I'm more than happy to finish his good intentions. He helped me cut and rip the boards to the proper size (thank goodness...I could barely lift one board by myself!) and I constructed the rest.

Ben and I are trying to decide what finish to put on it. Invisible clear coat to preserve the way it looks now? Black stain to add some masculinity to the room? Dark brown to match the legs? Argh...it's so hard to decide! What would you do?

And late one night I was trying to decide what to put on the walls. I have sooooo many vintage frames and other things to hang, but I couldn't find any "ah ha!" pieces. I had my pile of table numbers from our wedding sitting near the front door (along with other wedding stuff that still needs to be put away), so I thought framing them would add the perfect graphic element! I laid them all out (I'm not sure where number 3 is...?) and they look great! I just need to get some glass cut and add a backing. Can't wait to put it up on the wall!

And lastly, my prized china cabinet has found it's home. Caddy corner in the dining room, ready to show off all my prized goodies! :)

Phew! I've got a few more finishing touches to add to the dining room, including the closet that I'm turning into a reading nook and treatments for the windows, and then it's on to the kitchen!

Wednesday, September 28, 2011

New Old Things in my Etsy Shop and a bit of a Sale!

I was doing a little bit of unpacking and much needed cleaning (yes I still have lots of stuff that is still packed up from our move!) in the studio earlier today and I found these forgotten characters. I made these a couple of years ago and I'm not sure why I still have them. Even though I have neglected them, they still smiled up at me in an unconditional love kind of way and I decided that these guys need nice new homes right now!
Soooo...I just listed them all to Etsy at a slightly lower than usual price. If you see one that you'd like, skip over to Etsy to pick it up or you can just email me at vintagebycrystal@yahoo.com and let me know which one put a twinkle in your eye. :)

Oh...and these ones might be even older! I can't remember the last time I needle felted something for Halloween...but the witch and pumpkin are needle felted wool and then hand painted. The sweet kitty is from my chalk pouring days and is quite proper and snooty (and cheap!). :)

Saturday, September 24, 2011

Happy Birthday Mom!

It's my moms birthday today and since I live 10 minutes away from her now, I finally get to see her on her birthday! And this is what I'm giving her...shhhh.... I found it at Brimfield and was attracted to it immediately. I really want to keep it for myself, but I love my mom very much and this will go perfectly in her stork and baby collection. Happy Birthday Mom! Not another year older, but another year wiser! :)

Friday, September 23, 2011

Bridal Hair Pieces

Having just gotten married, I have a new found appreciation for all things bridal. It's an occasion where it's ok to go all out and think about the finest details, especially what a bride wears when she walks down the aisle. I made the head piece for my own wedding, a burst of glass glitter stars shooting up the side of my head. It was fun to think up and fun to make.
About a week ago, another bride purchased a cake topper and then asked me if I ever made bridal pieces for the hair. Why not? I have tons of wonderful materials to use and I've already practiced on my own wedding.
After giving me some guidelines, I came up with this pretty piece. Just a few different materials come together (including some feathers from Levi, one of my parakeets) to create something so pretty. I love how it came out and just wanted to share it with all of you.


This is my starburst, post wedding after I yanked some of the glitter off with my hair. It looks much better on a head than by itself.

Maybe I'll make some more just for fun. :)

Yay!

Thursday, September 22, 2011

Shabby Apple Giveaway!

Summer Break

Yes that's right...I'm having a giveaway! But instead of my usual spun cotton goodies, the lucky winner of this give away will receive a beautiful, gorgeous outfit or dress! And I'm terribly jealous.

Shappy Apple, an amazing online apparel boutique asked me to pick out an outfit or dress from their shop to giveaway on my blog. Well I certainly didn't have to think twice! What better way to reward my fantastic, wonderful, loyal, beautiful readers than with a giveaway like this? They have the most amazing outfits, dresses and my oh my...their bathing suits are to die for!! Very vintage and adorable. Their website is very beautiful too.

But anyway, back to the giveaway...all you need to do to enter is to leave a comment here, on my blog, letting me know which of the Shabby Apple outfits pictured here is your favorite and why. Only one of the outfits is the one that I (secretly) chose to giveaway and out of all the people who choose that particular one as their favorite, I'll pick one winner randomly. That's a fun way to do it, right?

I'll announce the winner (and reveal the giveaway dress or outfit) in one week, next Thursday, September 29th. The winner will give me their size and address and Shabby Apple will ship directly to a US address only (if you live outside the US, you can ship it to me, I could use a new outfit! Just Kidding! Sorta...). No returns or exchanges.

Sounds pretty great right? Ok...now look through all the photos and pick your favorite! :)

San Gabriel

After Class

Co-Ed

With Honors

Spanish Steps

You can "like" Shabby Apple's facebook page and definitely take a peek at their website. Beautiful photos and vintagey designs. They have women's dresses, maternity (is it wrong to have a baby just for the clothes?), vintage style accessories, etc. Ok...enough raving. Good luck! :)

Tuesday, September 20, 2011

My day...

I can't believe it's going on 5:00 already! The day really sped by. This morning I worked on a few final pieces for a large wholesale order containing hundreds of pieces. Then I added the identification labels and hooks for all the ornaments. Then I spent several hours (wow...hours?) packing it all up safely for it's trip overseas. When I was packing it up I realized I was missing two skiing Santas...so I had to stop and make some, which are drying as we speak.

While working on those Santas, Paige got into a her snuggly mode. She jumps on my lap and drapes herself over my left arm (always the left)...rendering it almost useless. It's so hard to resist her when her smiling kitty face looks into mine in a "I'm so happy right here...in this exact spot...on your arm" kind of way. She slows my progress somewhat for the remainder of her stay.

It's been a while since I've made non-custom wedding cake toppers. It was lots of fun and I pulled out and played around with lots of fancy materials that I rarely use. These toppers are heading off to Japan.

Phew! That's a lot of pieces! No wonder it took so long to pack. I started these pieces months ago and it feels good to be finished with them. Accomplishment!

This sweet little girl is part of a smaller order going to the Taft Museum in Cincinnati. Ok...I better start packing that one up right now! :)

Oh...and my shelves are coming along great! I just need to add the baseboard and the crown molding and then it's done! Yippee! I think I'll have time to make us a dining room table too...tonight I'm going to raid the loft of my dad's barn for some nice old wood.

And Oh yeah...this week I'll be having a give away! Hint...it's really awesome...but probably not what you think! Stay tuned!

Monday, September 12, 2011

Look at what I did this weekend!

Ok...well maybe it's not so impressive right now, but it's getting there! Ben was away the whole weekend on a camping trip and I spent my time in the dining room listening to the Princess Diaries movies on TV and building shelves!
I've been waiting to have shelves built in the dining room ever since we moved in. I had two carpenters come in to give me quotes on this project and two other smaller carpentry projects (in the kitchen and living room) and both quotes came out to around $11,000! Yikes! Well that was way more than I had in mind, so I thought...hmmmm...maybe I can do it myself! And like a true DYIer, I got to work as soon as I could (which meant after the wedding, and after the honeymoon, and after I got caught up on some of my backed up work in the studio because of the wedding and the honeymoon (now do you see why I wanted to hire a carpenter in the first place? lol).

Our house is full of huge windows, doors, and archways, which leaves little room left for walls. I hate blocking windows with furniture, and without furniture, where can I house my collections? Soooo, I thought it would be great to take some of the most wasted space in the house and turn it into an area of "extreme" use and therefore I decided to add wrap around shelves from floor to ceiling on one and a half walls in the dining room. The wall space I wanted to utilize was split many times by two huge windows and a door, resulting in tall narrow strips of wall. Almost no furniture would fit there and I thought I could do better than simply hanging some pictures. So, to work I went!
A spent the morning at the hardware store and lumber yard down the street and running around the house collecting tools (and a trip to my dad's farm where he has a plethora of tools that he so generously lets me borrow). And after some finagling, some minor redesigns and some practice, I got the hang of it and sort of figured out how to the get those dang shelves cut, installed and in place without taking all the old molding off (and painted too...but that was the easy part). I made the shelves adjustable because I know how helpful that can be and it turns out that getting the holes for the pegs to match up to each other was the hardest part. It's not perfect, but luckily it's not noticeable imperfect either, phew! And the shelves are actually more complete than they look, I just ran out of shelf pegs (I bought all that hardware store had), so most of the shelves are awaiting their pegs. The molding on top and bottom will wait until the rest of the unit is built.

Ok...that was the half of a wall...now it's time for the full wall! Stay tuned and wish me luck! :)

And also, I really wanted to thank all of those who snapped up one or more figures from the update on Friday. It was a major success and it makes me feel so good that many of you out there are just as quirky in taste as me! :)

Saturday, September 10, 2011

Tinsel Trading Workshop Details

The details for the Tinsel Trading workshop I'll be teaching are finally all worked out and we're ready for an official announcement. Yippee!

The main thing to take note of is that we changed the date. The original date of October 1st is really just right around the corner and for people who need to plan ahead or for people who are traveling, I thought moving it out a bit would make it much easier. The new date is Saturday, October 22nd from 11-4. And if you want to take the class, but think it's too far of a trip for a single event, I can tell you all about the things that are going on (haunted houses anyone?) and the places I love to go (cool stores and cool hangouts) and you can easily make a fabulous long weekend out of it. :) October and December are my favorite times to visit the city and I hope you'll come take my class and check out New York!
I made the workshop as inexpensive as I could (because that's what I would want if I were taking the class!) and basically for the price of buying the finished piece, you'll be able to make your own, just the way you want and I'll teach you all the tricks and techniques along the way. Most or all of the materials will be provided (bringing small pliers might be helpful as I don't have too many, or we could share) and if you wanted to (but it's not necessary), you can buy extra doodads from the Tinsel Trading shop to add to your creation. You can take a break and walk around (or in my case, snoop around), pick out something awesome and glue it on right then and there...how neat is that? Oh...plus TT is providing a "light lunch". Sounds good to me!
The official class description is below and spaces are limited. If you have any questions at all...just let me know! :)

Learn the basics of spinning cotton in Crystal Hanehan of Vintage by Crystal’s spun cotton Spooky Hollow Treat Box workshop!

For the same price as the finished piece itself, learn how to make your own spun cotton figure on an arbored box from scratch using cotton, wire, crepe paper, old flowers, glitter and other vintage doodads. You’ll learn numerous new tips for crafting and by the end of the class you’ll take home a completely original and one of a kind spun cotton figure along with a decorated box base and arch. Follow the sample piece and make a pretty red witch, or Crystal can help you make a pumpkin person, bat person or anything else your Halloween heart desires.

This class is fun and easy for everyone and allows you to be as creative as you want. Come join Crystal and get your craft on!

Spun Cotton Spooky Hollow Treat Box
Instructor: Crystal Hanehan (Vintage by Crystal)
Saturday, October 22nd, 11am-4pm
Workshop Price: $85

Friday, September 9, 2011

Halloween Update!

Happy Halloween Spider - SOLD

I am soooo excited about Halloween this year. And not just Halloween, but fall itself. The leaves falling, the brisk air, apple picking, pumpkin carving, Halloween parties and trick-or-treaters. I just love it all! This little lot of Halloween critters and characters kicks off the season in high spirit and funny fashion. I've created some classic characters, some new characters and a good collection of figures with paper mache sculpted heads. I hope you're just as excited as me!

As usual, blog readers get first dibs on my new spun cotton one-of-kind figures. Click on photos to enlarge. If you see something(s) you love, just email me at vintagebycrystal@yahoo.com and I'll let you know if they're still available. First come first served! I'll update item statuses in this post as often as I can to make it easier for you to know what's available. Items often get scooped up quickly, so make your selection as swiftly as you can, you can always add available pieces to your order later. Also feel free to include second choices if your first choice is unavailable, but make sure you label them "second choice".

Shipping is $3.50 for one item and $1 per additional item up to $6.50, then additional pieces are free. All paid orders will ship out immediately and should arrive in a few days. If you'd prefer priority shipping, which is a little faster, just let me know, it's only $1.50 extra. I send Paypal invoices via email unless you specify that you'd rather pay via check. And of course email me if you have any questions! Happy Shopping!

Norma Melonhead - SOLD
Miss Nibbles - SOLD
Jumping Jack-o-Lantern - SOLD

Scared Stella - SOLD
Haunted Hannah - SOLD

Pammy Pumpkinhead - SOLD
Portia Pumpkin (on box) - 35
Peter Pumpkin and his Halloween Tree - SOLD

Fanning Fanny Pumpkin (with cats on the brain) - SOLD
Cruella the Crow Elf - SOLD
Carmen Carrot Pumpkin (with cats on the brain) - SOLD

Polly Poltergeist - SOLD
Patches the Cat - 23
Penny in her Pumpkin Dress - SOLD

Gabby Gourd - SOLD
Gary Gourd with his Pompous Puppet - SOLD

Odelia Onion - SOLD
Ollie Onion - SOLD

Miss Kitty and her Kitties - SOLD
Boo Butterfly - SOLD
Headstone Holly - SOLD

Party Dress Girls:
Marmalade Mandy - SOLD

Potion Portia - SOLD
Lantern Lilly - SOLD

Party Dress Girls:
Stephanie Strange - SOLD

Hair-raising Helen - SOLD
Happy Haile - SOLD

Long Nosed Owls:
Arachna - SOLD

Chaos - SOLD
Mary - SOLD

Carrie - SOLD
Mr. Murray the Mushroom - SOLD
Beelzebub - SOLD

Melon Family:
Mr. Thomas Melon -
SOLD
Mrs. Deborah Melon and Little Tommy Jr. - SOLD

Haunted Forest:
Ghostly Leaves - SOLD
Fall Leaves - SOLD